
Visit shoplite.africa/testers/.
Build 24 verified production release: the ShopLite 1.6.12 build 24 signed artifact passed connected-phone acceptance, upgrade-in-place data preservation, packaged-APK installation and the crash/ANR audit. The accepted evidence covers the 90-day trial, durable offline-receipt workflow and selected-currency values with comma grouping and exactly two decimals. The current Build 24 user-guide PDF was visually checked page by page. APK SHA-256:
F61CD669E75E896C5542C0EC2DFEC76FE88F98F631C2FCD440B478636AE53C11.Simple help for everyday shop work
Learn ShopLite one clear step at a time.
Install the app, create your store, control units, codes, variants, bundles, purchasing, batches and branches, then sell, work offline and create useful reports.
Start here
Install ShopLite on Android
Use the official ShopLite website or an approved marketplace. Build 24 is the verified production release; download the APK and its checksum together from ShopLite.Africa.
Tap the Android download button.
If asked, allow Chrome to install this app.
Check version 1.6.12 build 24 and compare its published SHA-256 before installing.
Install, open ShopLite, then revoke Chrome's install permission.
Check the address: Only continue when the browser address is exactly shoplite.africa.
Account
Sign in or create your store
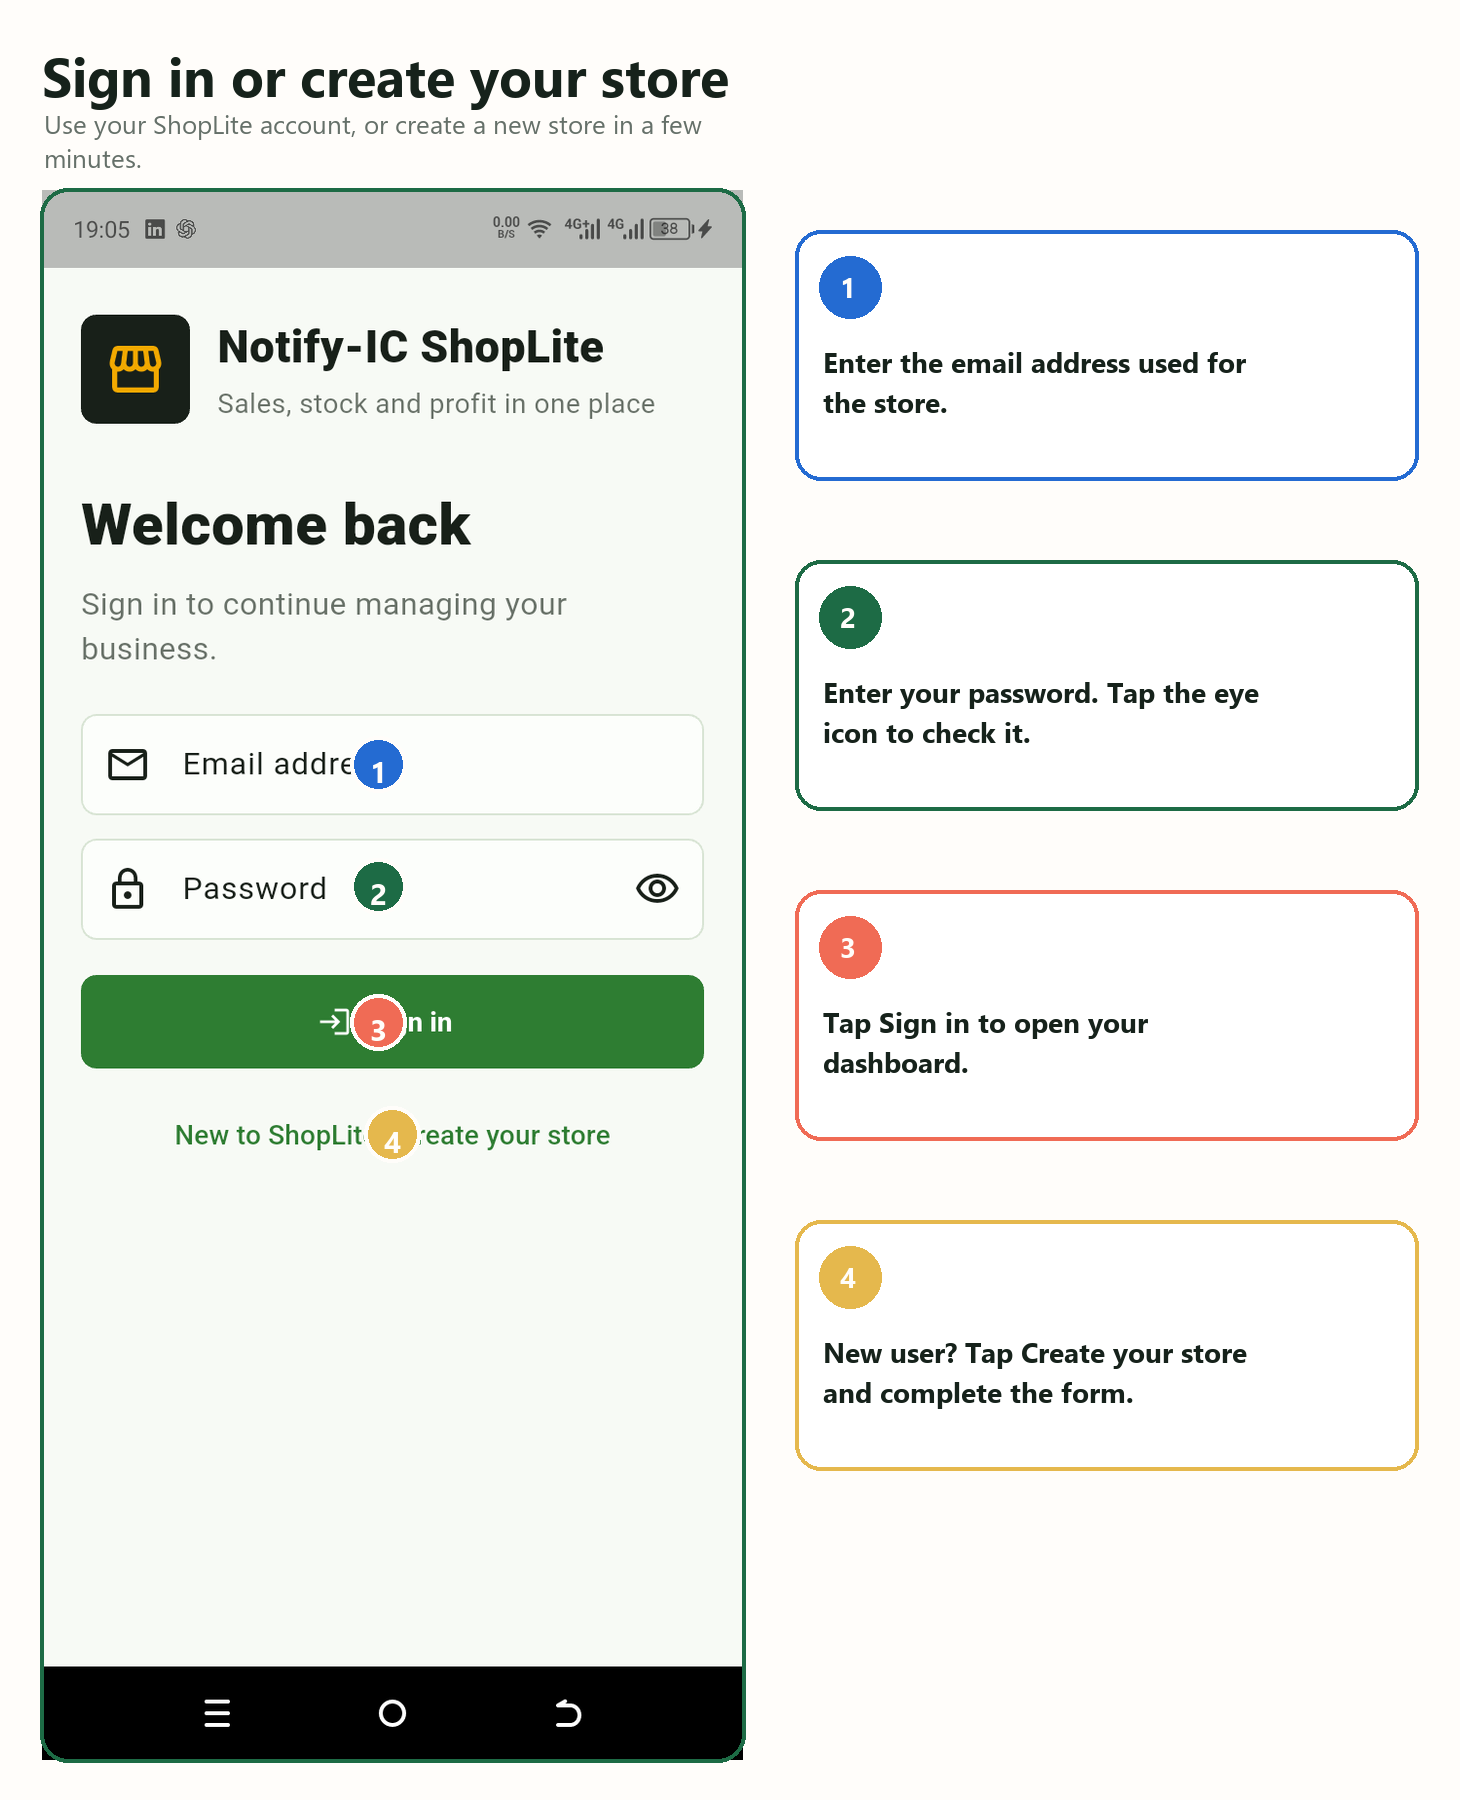
Do this
- New business: tap Create your store.
- Complete the owner and business details.
- Returning user: enter email and password.
- Tap Sign in once and wait for the dashboard.
Create a business only once. Add staff to the same business account.
Daily overview
Read your dashboard
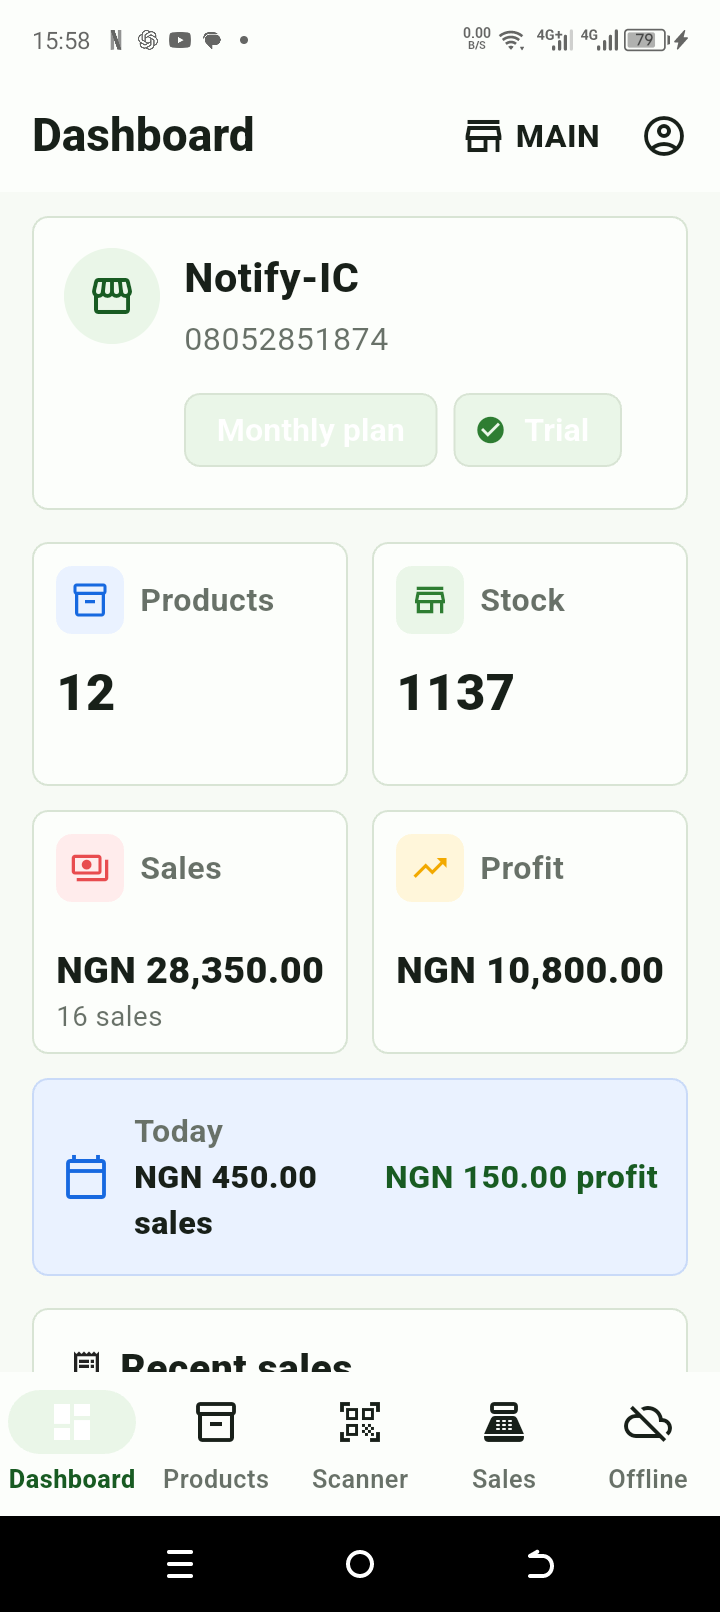
What the numbers mean
- Products: product records in the shop.
- Stock: units currently available.
- Sales: value of completed sales.
- Profit: estimated selling price minus product cost.
Check this page at the start and end of each business day.
Inventory
Add products by scanning or typing
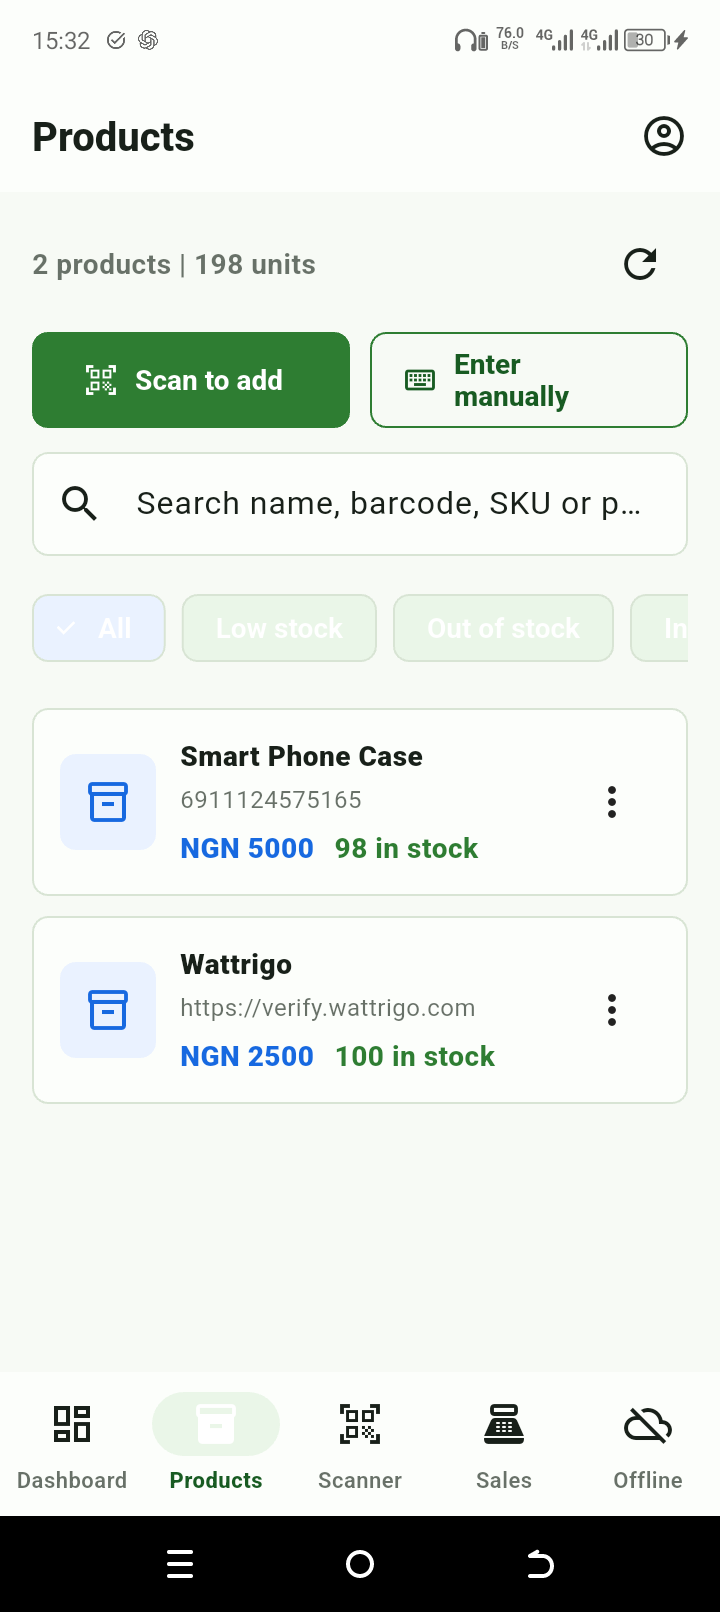
Choose the easiest method
- Tap Products.
- Tap Scan to add when the pack has a barcode or QR code.
- Tap Enter manually when there is no readable code.
- Use search and filters to find products later. Use the three-dot menu to edit a product.
Scan to add avoids reading or typing tiny numbers printed on a pack.
Fast stock entry
Scan a barcode or QR code to add stock
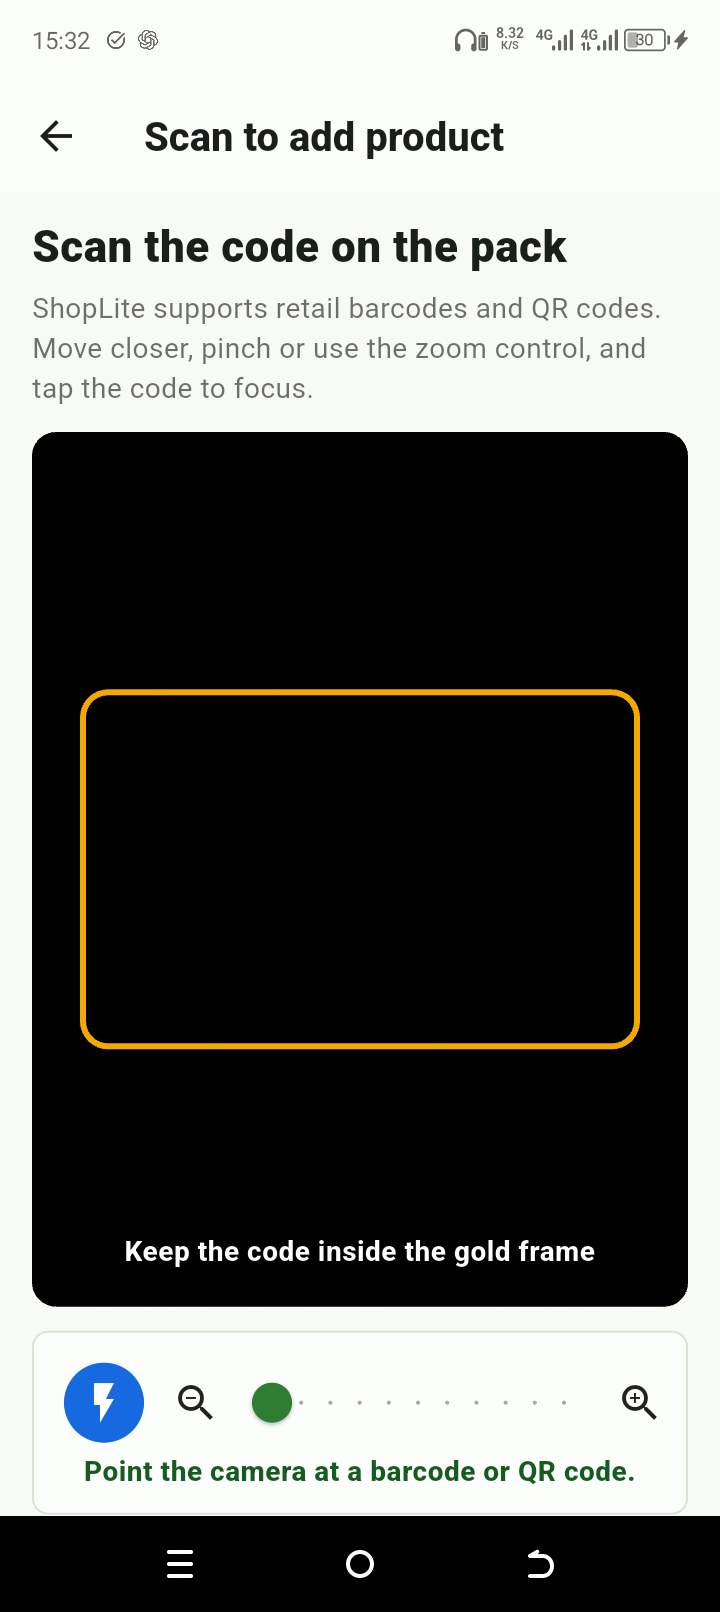
Scan the code on the pack
- Keep the complete code inside the gold frame.
- Move closer, pinch or use the zoom slider when the code is tiny.
- Tap the code to focus. Use the torch when the pack is dark or shadowed.
- For a new code, complete the prefilled product form and tap Save.
- For an existing code, tap Add stock, enter only the quantity received, then confirm.
Avoid duplicates: Always scan first. ShopLite checks whether the code already belongs to a product before it opens the form.
Barcode and QR
Scan with the camera or look up manually
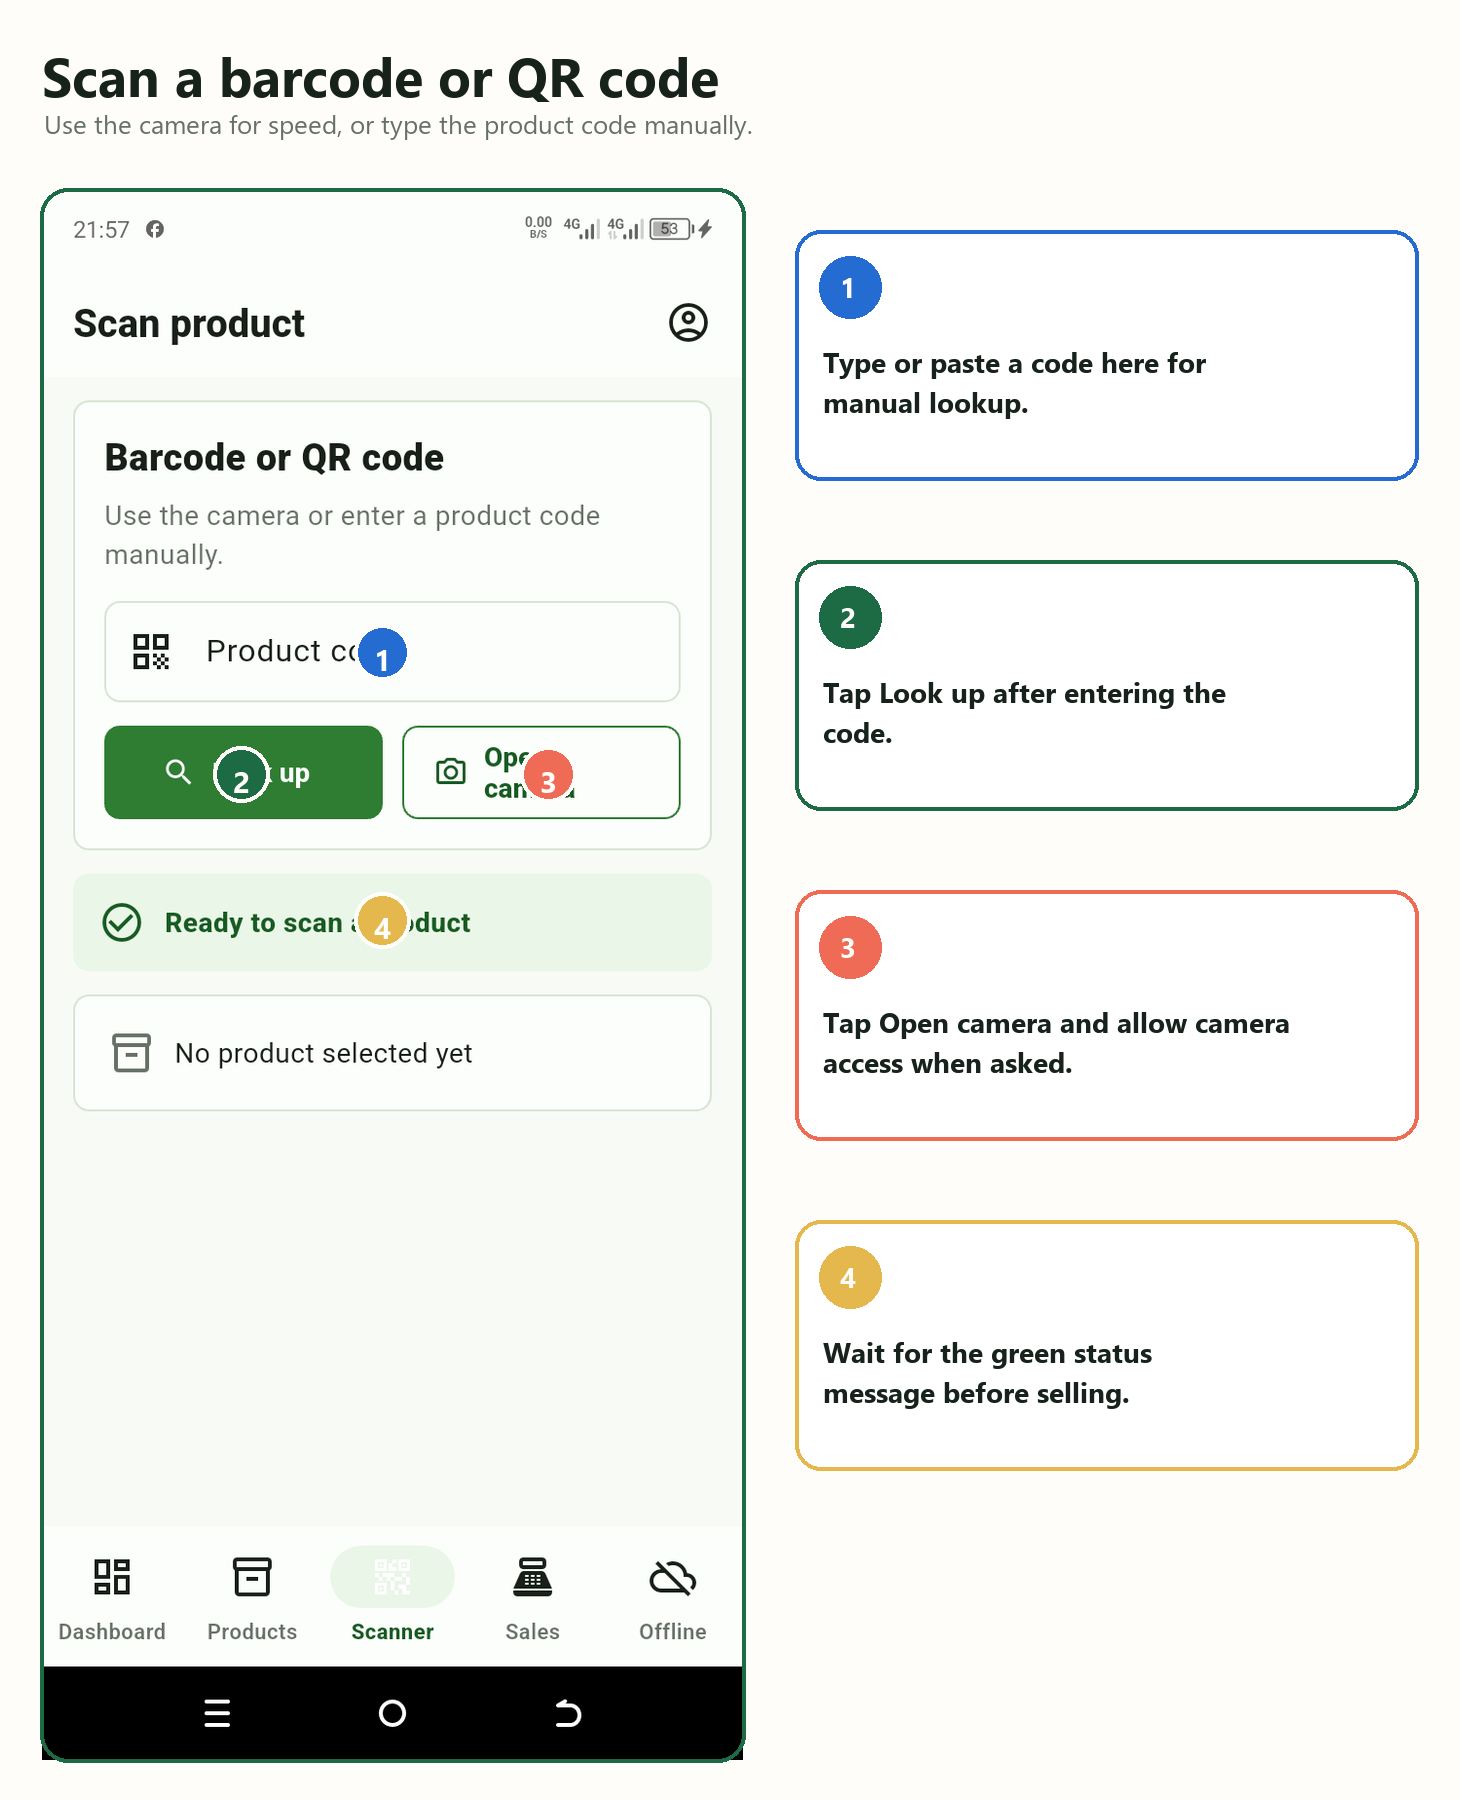
Find a product for sale
- Tap Scanner.
- Tap Open camera and allow camera permission.
- For manual entry, type the code and tap Look up.
- Wait for the green match message before selling.
Products > Scan to add creates inventory. The bottom Scanner tab finds a saved product for a sale.
Camera position
Aim at the code correctly
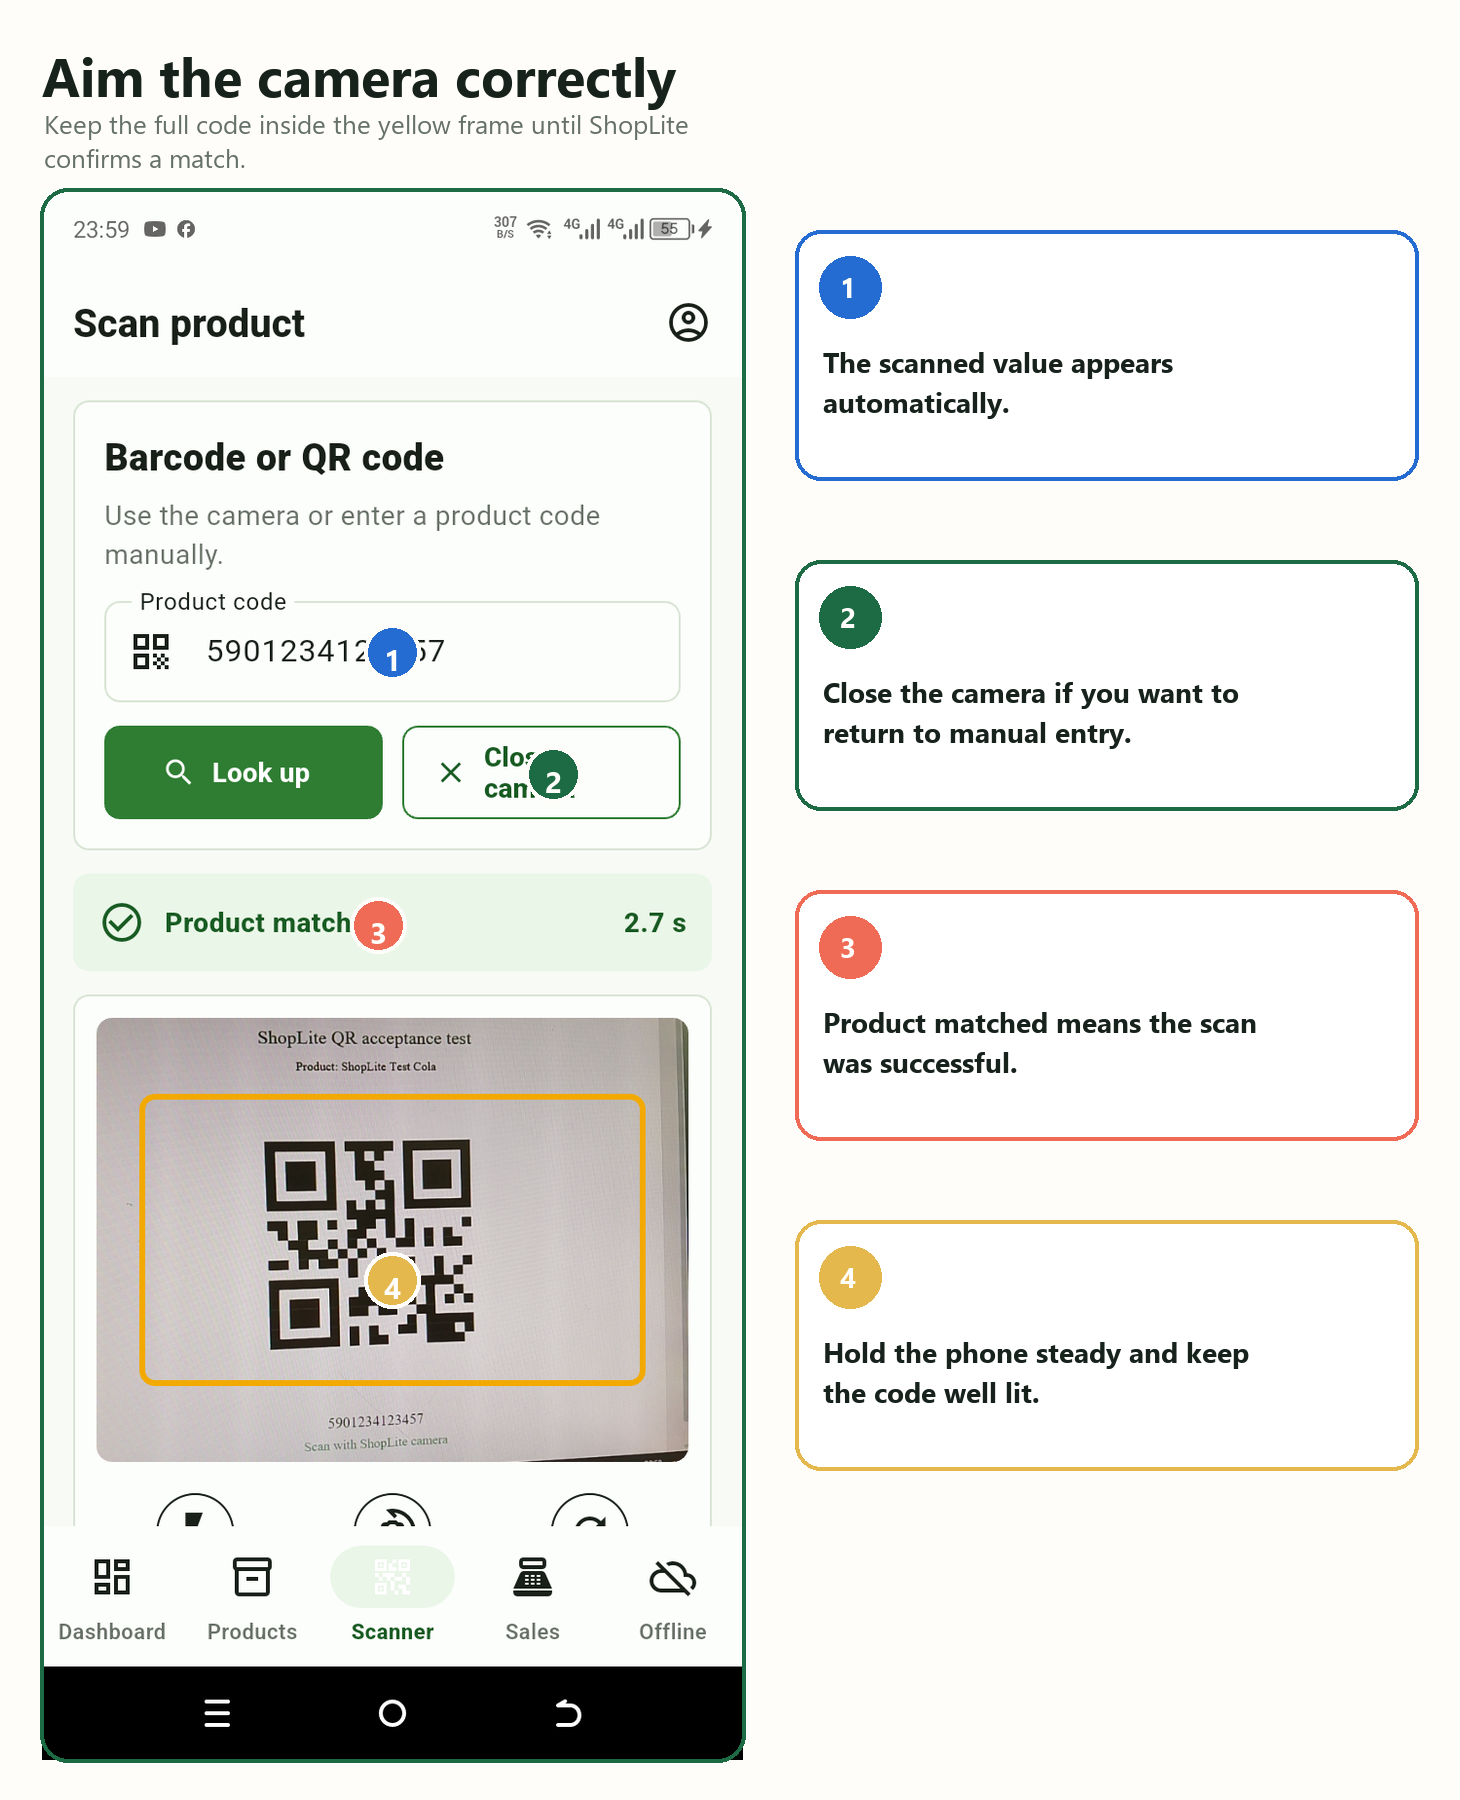
Get a fast match
- Keep the full barcode or QR code inside the frame.
- Hold the phone steady and tap the code to focus.
- Avoid glare and dark shadows; use the torch if needed.
- Use zoom for a tiny code, but keep all four edges visible.
- Wait for Product matched.
If a damaged code will not scan, type its printed value manually.
Build 21 inventory controls
Set up units, alternate codes, variants and bundles
| Tool | Use it when |
|---|---|
| Alternate code | The same stock item has another barcode or QR code |
| Unit | A piece, pack, carton or crate contains a known number of base units |
| Variant | Size, colour or another option must keep its own stock balance |
| Bundle / hamper | Several existing products are sold together under one name or code |
Add codes and selling units
- Open Products and choose the product.
- Under Codes, scan or type each alternate code. Save only after ShopLite confirms it is not assigned elsewhere.
- Under Units, choose piece, pack, carton or crate and enter the exact number of base units it contains.
- Review the conversion, then save. ShopLite keeps stock in base units and converts the selling unit at checkout.
- Scan every code once and confirm it opens the same intended product and unit.
Never guess a conversion. If one carton contains 24 pieces, enter 24 only after checking the supplier pack.
| Before saving a bundle | Check |
|---|---|
| Component | Correct product and variant |
| Quantity | Required selling unit and conversion |
| Bundle code | Unique barcode/QR code, if used |
| Availability | Every component can satisfy the bundle quantity |
Create variants and a bundle
- For stock that must remain separate, open Variants, add the option name/value and give it its own code when needed.
- To make a hamper, choose Bundles, enter its name and optional unique code, then add two or more existing components.
- For each component, choose the variant, unit and quantity actually consumed by one bundle.
- Remove any repeated component and review the least-available quantity before saving.
- At checkout, scan the bundle code or choose the bundle. Confirm one clear bundle line appears, then complete the sale once.
- For a return, open the original receipt and return the bundle quantity physically received. ShopLite restores the original components and batch allocations once.
A bundle has its own selling identity, but its availability comes from every component. Holding or cancelling a basket must not change stock.
Build 21 inventory controls
Order, receive, rotate and label stock
| Stage | Required record |
|---|---|
| Supplier | Name and authorised business contact details |
| Purchase order | Products, units, quantities, costs and expected totals |
| Receiving | Actual quantity, unit, cost, batch and expiry where applicable |
| Outstanding | Ordered quantity not yet received |
Supplier, purchase order and receiving
- Open Suppliers, add the supplier and save.
- Choose Purchase orders, select that supplier and add the ordered products, units, quantities and costs.
- Review the total, then submit or approve according to your role.
- When goods arrive, open the order and tap Receive. Enter only what was physically delivered.
- Add the batch number and expiry date only when the product carries them.
- Save once, then confirm received, outstanding and stock quantities. Repeat later for a genuine partial delivery.
Do not replay a completed receiving action. A retry should return the same result without adding stock twice.
| Action | Result |
|---|---|
| FEFO sale | Uses eligible stock with the earliest expiry first |
| Adjustment | Records damaged, lost or expired quantity with a reason |
| Return | Restores the exact batches allocated to the original sale |
| Internal label | Identifies the selected product/variant/unit without changing stock |
Batches, expiry, adjustments and labels
- Open Batches and expiry and review expired, near-expiry and later-expiry quantities separately.
- When selling, confirm ShopLite allocates eligible stock in first-expiry-first-out order; do not sell an expired batch merely because it appears first.
- For damaged, lost or expired stock, choose Adjust stock, select the correct batch/variant/unit, enter the quantity and a clear reason, then submit once.
- To replace an internal shelf label, choose Print label, select the intended product, variant and unit, preview the human-readable details, then print or share.
- Scan the printed label and confirm it resolves back to the same record. Cancelling print/share must not change inventory.
Expiry tracking helps stock rotation; it does not certify that a product is safe. Follow the manufacturer's storage and safety rules.
Build 24 branch controls
Control branches, prices, transfers, counts and approvals
| Branch control | What stays separate |
|---|---|
| Stock | Available quantity at each branch |
| Price | Approved selling price for that branch |
| Staff access | Branches each user is authorised to operate |
| Reports | Branch source figures before owner consolidation |
Create a branch and set its price
- Open Branches, tap Add branch and enter a unique name/code.
- Assign staff only to the branches they need.
- Switch to the intended branch, open the product and set its branch selling price.
- Review the price and stock at a second branch; they must remain unchanged unless updated there.
- Before selling or receiving, check the active branch shown in ShopLite.
The product identity is shared by the business, but branch stock, price and staff access are controlled separately.
| Transfer status | Stock treatment |
|---|---|
| Draft | No movement posted |
| Dispatched | Leaves available stock at the sending branch and becomes in transit |
| Received | Clears in transit and adds the confirmed quantity at the receiving branch |
| Rejected/cancelled | Restores or reconciles the permitted quantity once |
Transfer stock between branches
- Open Transfers, choose the sending and receiving branches, then add product quantities.
- Review and submit for approval when required.
- The authorised dispatcher confirms Dispatch once. The receiving branch must not sell in-transit stock.
- The receiver checks the goods, records the quantity actually received and confirms once.
- Review both branch balances and the in-transit value. A network retry must not repeat dispatch or receipt.
Do not mark a transfer received before the receiving branch checks the goods.
| Controlled record | Review before posting |
|---|---|
| Physical count | Snapshot, counted quantity, variance and reason |
| Approval | Request, initiator, risk, evidence and approver |
| Audit | Business, branch, action, record, actor, approver and time |
| Consolidation | Same period/currency and totals that reconcile to branch sources |
Count, approve and audit
- Open Stock counts, choose a branch and start a count. Save counted quantities as a draft.
- Review every positive or negative variance and add the reason; a draft must not change live stock.
- Submit the reconciliation. The authorised approver accepts or rejects it; where separation of duties is enabled, the initiator cannot approve it.
- Use Approvals for protected price overrides, adjustments and transfers in the same way.
- Open Audit history and filter by branch, actor, action or time. Corrections are added as linked events rather than erasing earlier history.
- On the owner dashboard, compare branches for one named period and currency, then confirm the consolidated total matches the branch source totals.
Give each person their own login. Shared passwords weaken approvals and audit evidence.
Team access
Add staff without sharing the owner's password
| Role | Recommended use | Key access |
|---|---|---|
| Owner | Business owner | All features |
| Administrator | Trusted supervisor | Staff, products, stock, sales and reports |
| Manager | Branch or shift lead | Products, stock, sales and reports |
| Cashier | Sales counter | View products and create sales |
| Inventory | Stock controller | Products and stock |
Add a staff member
- Tap the account icon, then Staff and roles.
- Tap Add staff and enter the worker's details.
- Choose the least-powerful role that fits the job.
- Save, then provide the login privately.
Deactivate access immediately when a worker leaves or changes duties.
Business insight
Create daily, weekly, monthly or custom reports
| Report section | What it answers |
|---|---|
| Sales and profit | How much was sold and the estimated gross profit |
| Units and transactions | How many items and completed sales were recorded |
| Payment methods | How customers paid |
| Smart restock guide | Which urgent fast sellers combine stronger profit, low stock and shorter estimated stock cover |
| Staff performance | Which authorised user recorded each sale |
Run a report and plan restocking
- Tap the account icon, then Reports.
- Choose Today, This week, This month or Custom.
- Open Smart restock guide.
- Start with Reorder now, then compare units per day, gross profit margin, stock and estimated days left.
- Tap Copy CSV report for bookkeeping or a buying-list review.
The guide uses the sales, cost and stock data entered in ShopLite. It supports the owner's buying decision; it does not guarantee future demand.
Build 24 checkout
Complete product, unit, variant or bundle sales
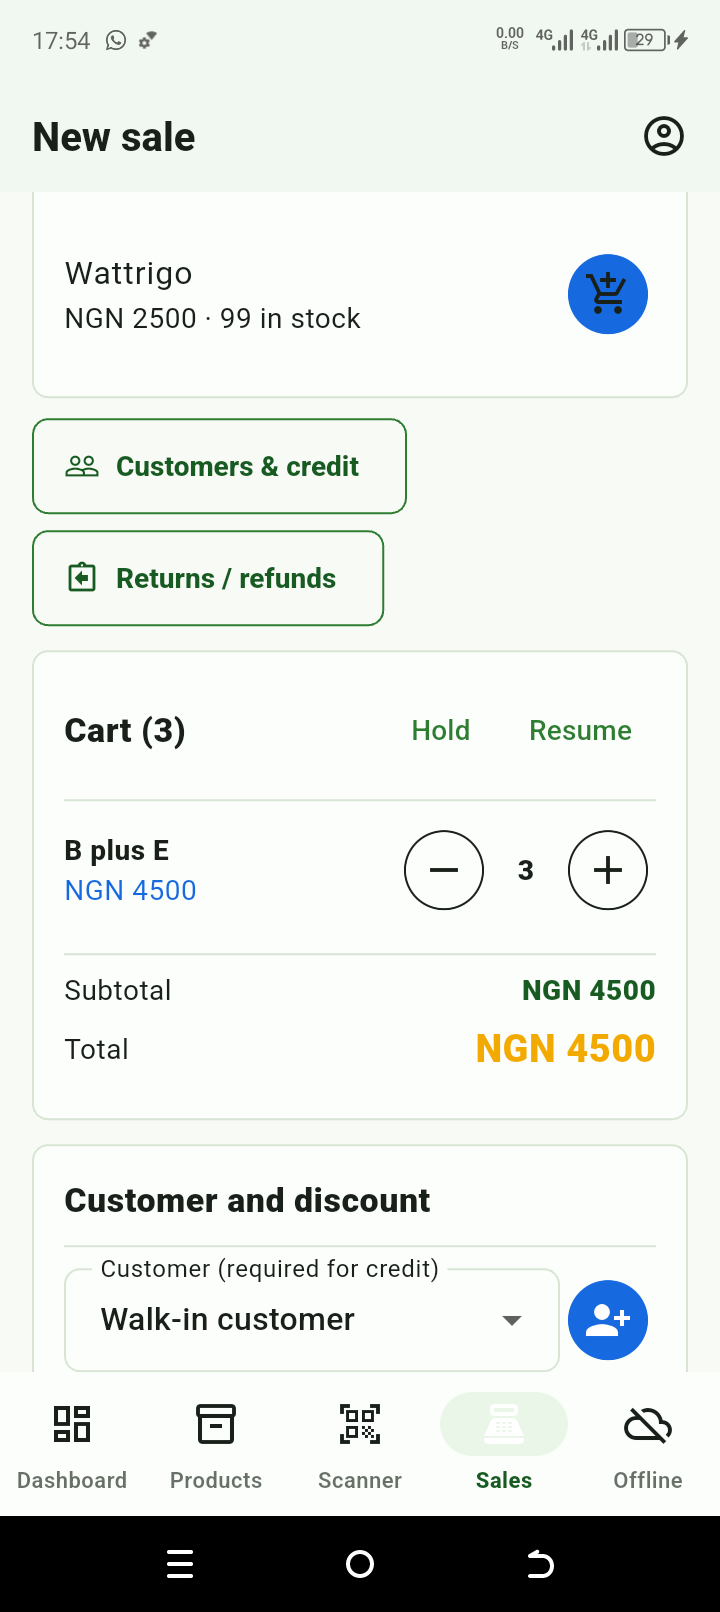
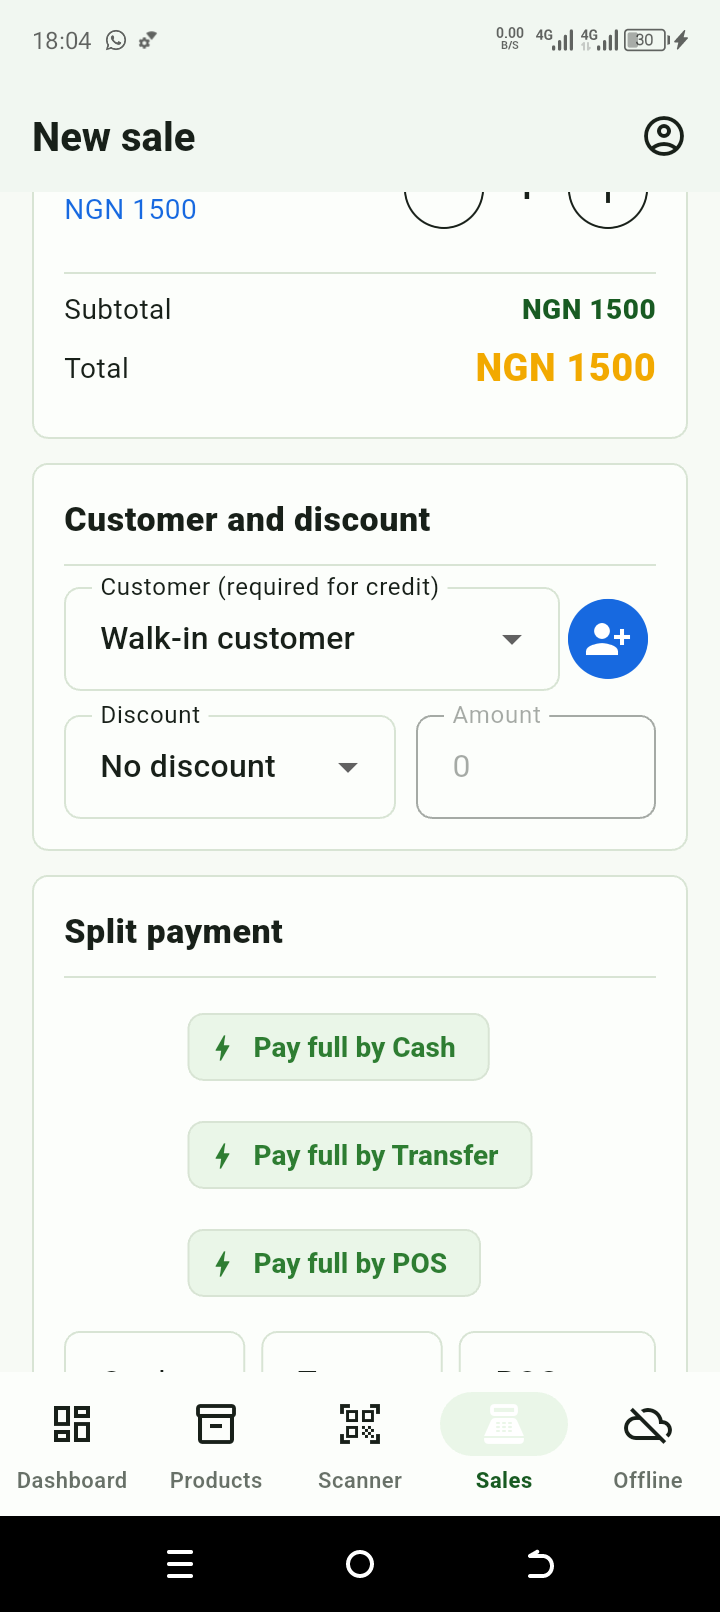
Complete the sale
- Open Sales, find each product and add the required quantity.
- For a normal sale, tap Pay full by Cash, Transfer or POS. For split payment, enter the amount received under each method.
- Add a fixed or percentage discount only after confirming it with the customer.
- If a balance remains, choose or add the customer. ShopLite records the balance as credit due in 30 days.
- Tap Complete sale once, then share the receipt by WhatsApp or use Print with an Android/Bluetooth print service.
Use Hold when a customer pauses shopping. Use Resume to restore the basket without entering the products again.
| Sales tool | What it does |
|---|---|
| Customers & credit | Shows outstanding balances, shares a friendly WhatsApp reminder and records repayments |
| Returns / refunds | Links a return to the original receipt, restores stock and states the cash refund due |
| Split payment | Records Cash, Transfer and POS amounts on the same receipt |
| Discount | Applies either a fixed amount or percentage before payment |
Credit and returns
- Tap Customers & credit to review balances.
- Choose a customer, then send a reminder or enter a payment received.
- For a return, tap Returns / refunds and choose the original receipt.
- Enter only the quantity physically returned and a clear reason.
- Give the customer the displayed cash refund; ShopLite does not send money automatically.
Owners, administrators and managers authorise returns. Credit repayments and returned stock are kept in the audit trail.
No internet
Keep selling, then synchronise safely
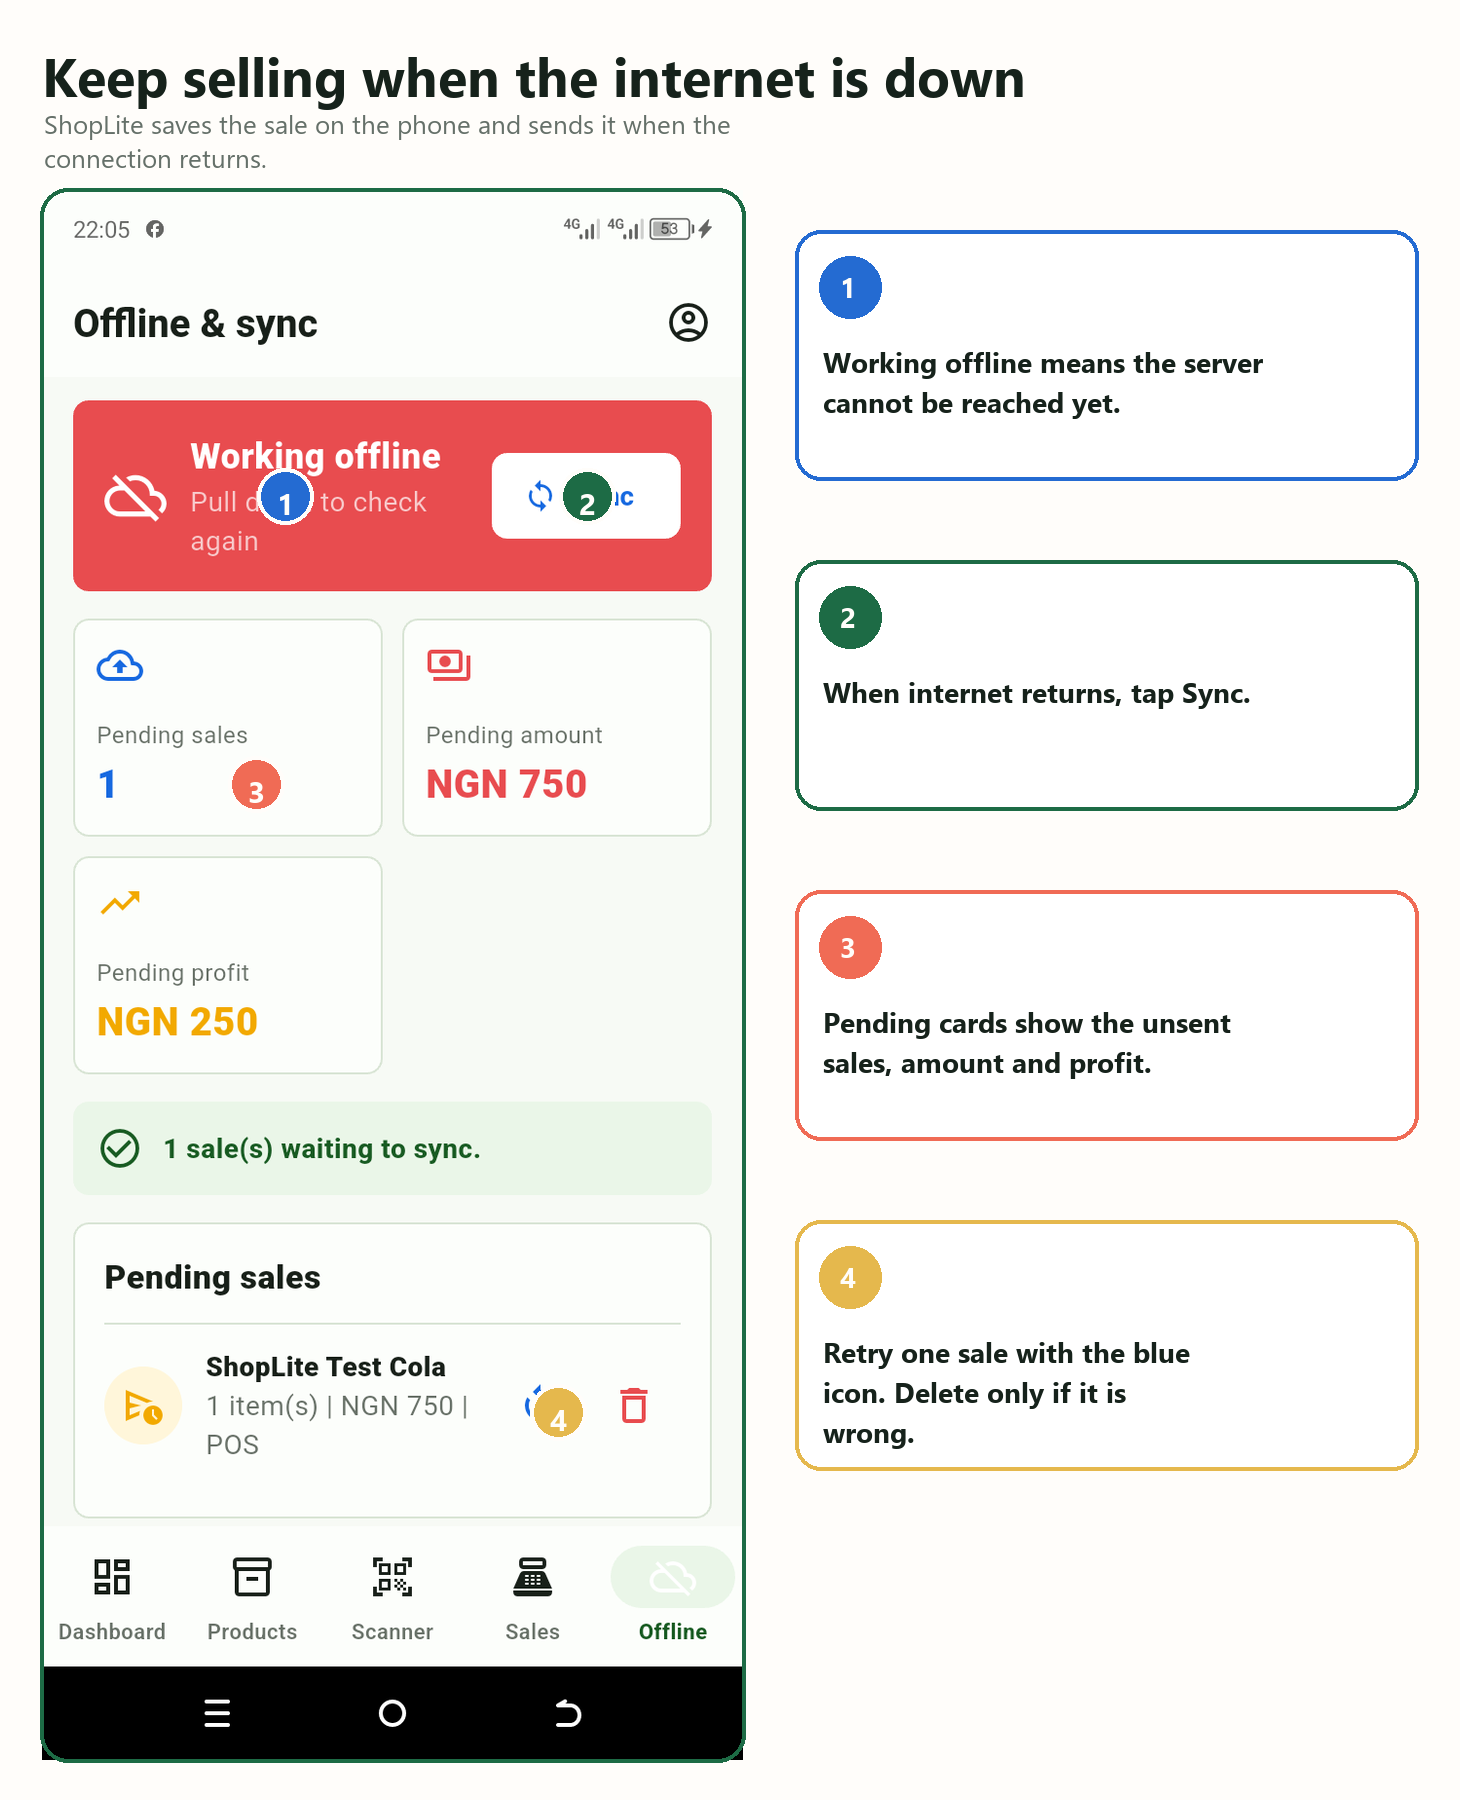
When the network returns
- ShopLite writes the complete pending receipt to device storage, including its products or bundles, units, variants, discount, customer and split payment, then reads it back to verify that it is durable.
- ShopLite clears the basket only after that exact receipt has been verified. If saving fails, the sale is not completed and the basket stays in place; free some device storage and try again.
- Restore mobile data or Wi-Fi.
- Open Sales and tap the offline-receipt banner to retry immediately, or allow ShopLite to retry automatically.
- Wait until the pending receipt count becomes zero, then confirm one server receipt and one set of stock/batch deductions.
Do not create a successfully queued sale again. ShopLite uses the original receipt identity so a retry cannot create a duplicate sale.
Regional setup
Choose the currency used in your shop
| Setting | What it changes |
|---|---|
| Business currency | Product prices, sales, stock values, profit and CSV reports |
| Subscription currency | Depends on the payment methods legally and technically supported for the business country |
Change business currency
- Tap the account icon.
- Choose Business currency.
- Select the three-letter currency used for your shop, such as NGN, GHS, KES, ZAR, XOF or XAF.
- Tap Save currency.
- Confirm that product, sales and report values show the new code.
NGN is the default. Changing business currency does not convert old prices or automatically enable a subscription payment rail.
90-day trial and plans
Choose a subscription plan
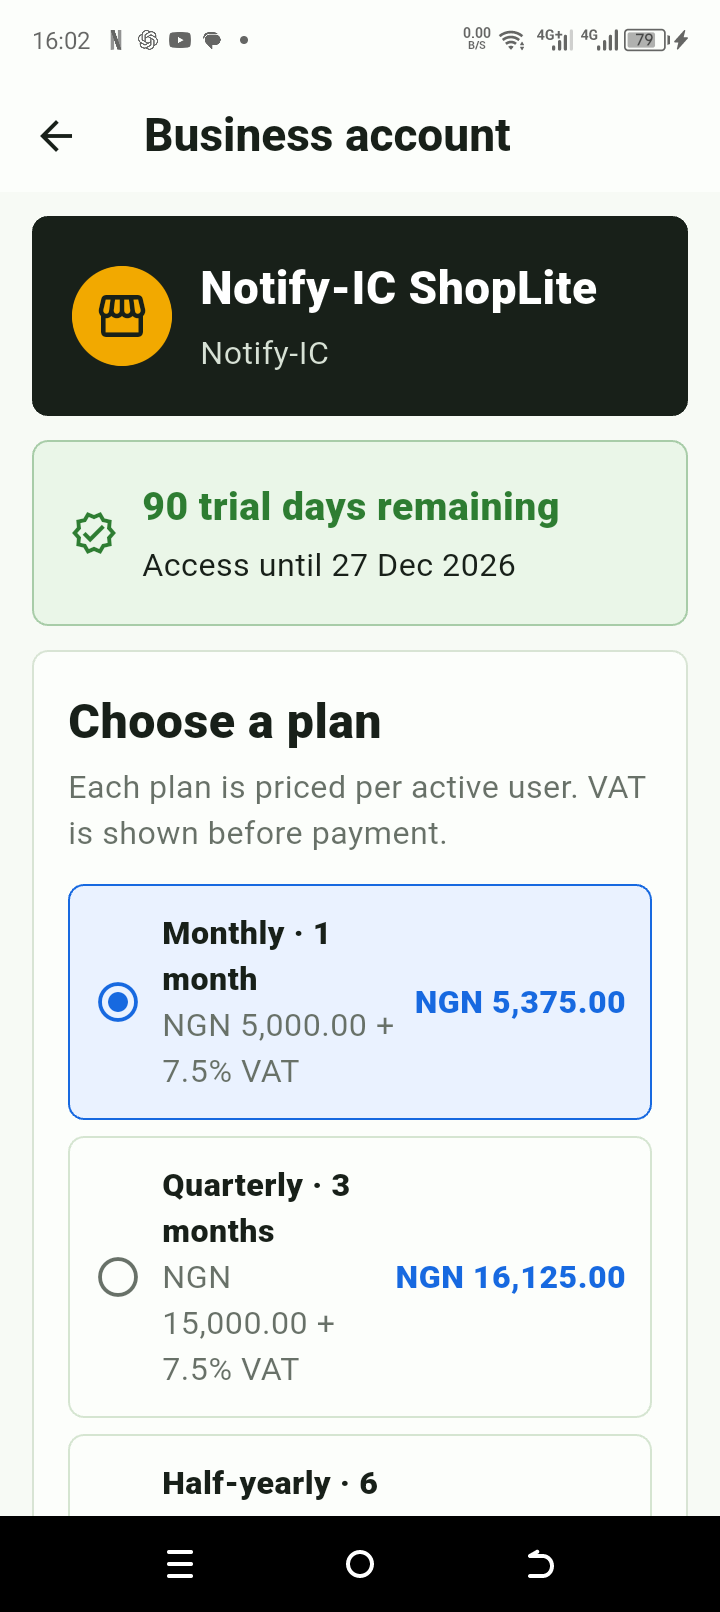
Subscribe securely
- Every new business starts with 90 days free. No payment is required to begin, and ShopLite does not make an automatic first charge when the trial ends.
- To continue after the trial, tap the account icon, then Plan and subscription.
- Choose monthly, quarterly, half-yearly or annual.
- Review the base price, VAT and final total.
- Choose Paystack, Flutterwave, SWIFT transfer in USD/GBP/EUR, or PAPSS via UBA when shown as available.
- For a bank transfer, use the unique ShopLite reference from the secure payment page.
Never send anyone your card PIN, password or one-time code. A transfer screenshot does not activate a subscription; ShopLite waits for verified bank confirmation.
Payment confirmed
Confirm your subscription is active
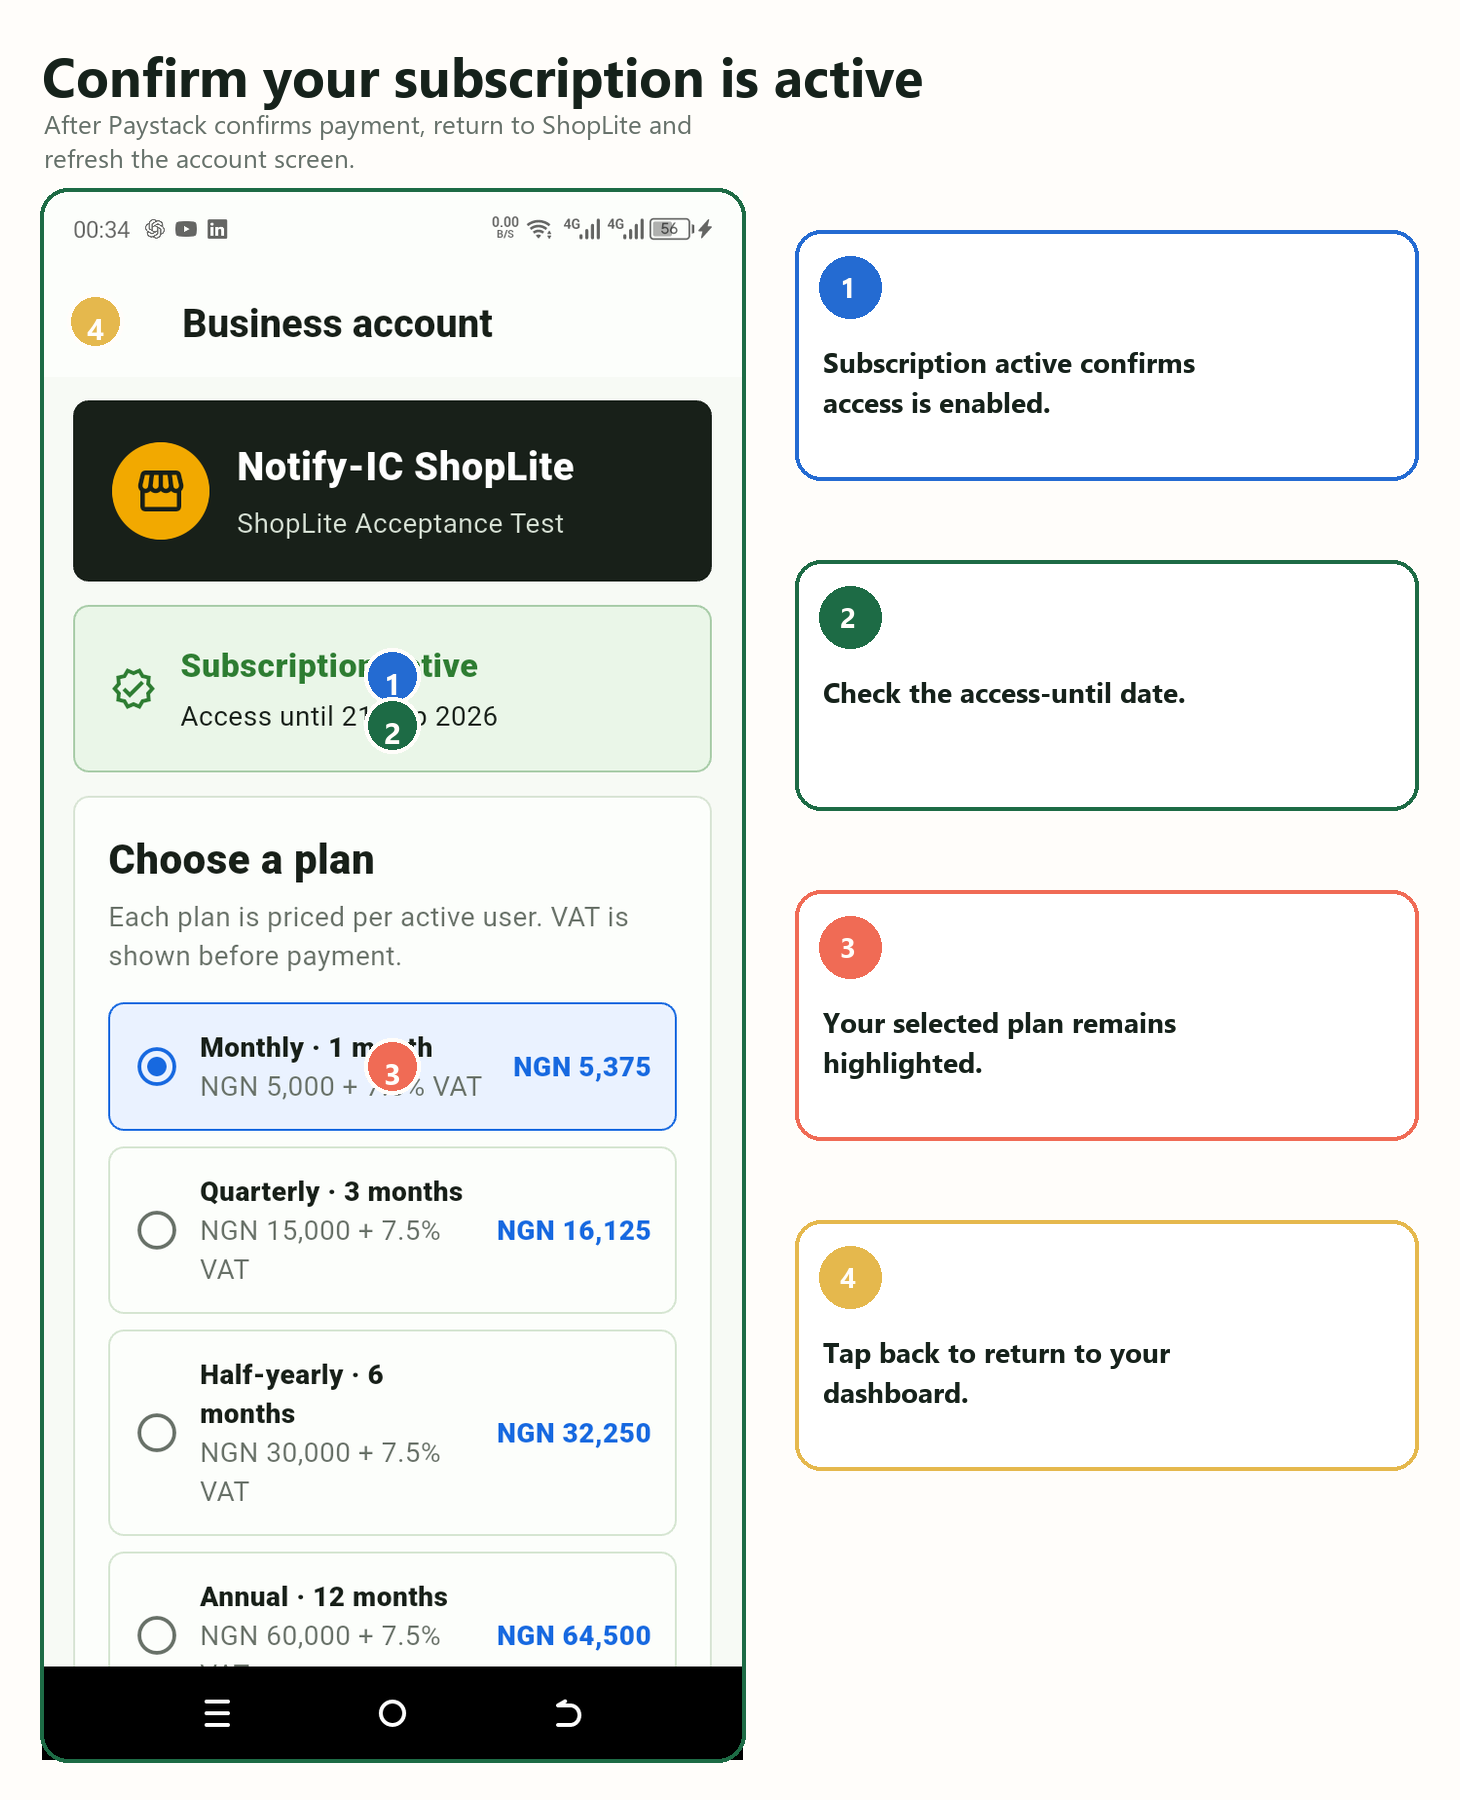
After payment
- Return to ShopLite.
- Open Plan and subscription again.
- Refresh if needed.
- Check Subscription active and the access-until date.
Keep the Paystack, Flutterwave, SWIFT or PAPSS reference if support is needed. Card and mobile-money payments can confirm quickly; bank transfers remain pending until reconciled.
Keep data safe
Check for updates and upgrade in place
| Before the update | After the update |
|---|---|
| Open Offline & Sync and reduce pending receipts to zero | Confirm the expected version and build |
| Confirm the current business, products and recent sales are visible | Confirm the same business and records remain available |
| Export any bookkeeping CSV records needed as a separate backup | Run one safe product lookup or controlled test sale |
| Charge the phone and use the official ShopLite download only | Recheck Offline & Sync before live selling |
Update without removing your data
- Open Account → Check for updates. ShopLite compares the installed build with the verified feed at shoplite.africa.
- If a newer verified build is offered, sync every pending offline receipt and confirm the pending count is zero.
- Confirm the current business data is visible and export any CSV records your business needs as a separate backup.
- Download only from the in-app official link or shoplite.africa.
- Install the signed APK over the existing ShopLite app. Do not uninstall ShopLite or clear app storage first.
- Open ShopLite, verify the version/build and confirm the existing business, products, sales and offline queue before live work resumes.
If data is missing or an offline receipt is still pending, stop and contact ShopLite Support before uninstalling, clearing storage or entering the transaction again.
Partner growth
Join and use the Ambassador programme
| Ambassador tool | What it does |
|---|---|
| Permanent referral code | Links referred merchants, installs and eligible subscription earnings to the approved Ambassador |
| Referral link and QR | Make it easier for a prospect to open the correct ShopLite registration path |
| Secure dashboard | Shows clicks, installs, registrations, paying merchants, commissions, settlements and leaderboard position |
| Scan QR to access | Opens the matching Ambassador dashboard only after the Ambassador is already signed in |
Start safely
- Apply at shoplite.africa/ambassadors/ and accept the current Partnership Terms.
- Provide accurate identity, contact and verified settlement-account details.
- After approval, copy your permanent referral code, link or QR from the portal.
- Track attributed merchants, earnings and settlements in the portal or ShopLite app.
- Use Scan QR to access my dashboard only while signed in to your own Ambassador account.
The QR is a shortcut, not a login bypass. New version 2 agreements allocate eligible pre-VAT subscription revenue 30% to the Ambassador, 30% to Notify-IC and 40% to ShopLite; VAT is separate.
Keep nearby
Daily routine and quick fixes
Simple daily routine
| When | What to check |
|---|---|
| Start | Dashboard and low stock |
| Sales | Product, quantity and payment method |
| Deliveries | Update stock before selling |
| Offline | Sync when the connection returns |
| Close | No pending sales; review totals |
Quick troubleshooting
Play Protect says “App blocked”
Do not panic and do not disable Play Protect. Verify that the APK came from shoplite.africa and that its SHA-256 matches the official checksum. Then open More details and use Install anyway only if your phone offers it and both checks pass. Otherwise delete the file and contact support.
Server temporarily unavailable
Check data or Wi-Fi, refresh, then sync any pending sale from Offline.
I forgot my password
Tap Forgot password? on the sign-in screen or open shoplite.africa/reset-password/. Enter the account email and check inbox/spam. The newest link expires after 30 minutes and works once; requesting another link supersedes every earlier unused link. Choose a new password of at least 10 characters. A successful reset revokes existing sessions. Never send the link or password to anyone.
Camera will not open
Open Android Settings, choose ShopLite, Permissions, then allow Camera.
Code will not scan
Clean the camera lens, add light, tap the code to focus, use the torch or zoom, keep the full code flat inside the frame, or enter the value manually.
Product already exists
Do not create another copy. Choose Add stock and enter only the new quantity received.
Product not found during a sale
Open Products, choose Scan to add, then save the same barcode or QR value before returning to the sale.
Plan not active after payment
Return to the account screen and refresh. Keep the Paystack reference for support.
No sound after a scan
Increase media volume, turn off silent or Do Not Disturb mode, and allow vibration. The green Product matched message confirms success visually.
A staff member cannot see a feature
Check the assigned role. Cashiers and inventory users intentionally cannot open financial reports or staff administration.
Still need help?
Tell us the screen name, what you tapped and the exact message shown. Never send passwords, PINs or full card details.